POS-Terminal RAM- & SSD-Upgrade: Speicher richtig auswählen, auf SSD wechseln, korrekt einbauen
Ein Kaufratgeber zum Aufrüsten von RAM und Speicher eines POS-Terminals — DDR-Generation und Bauform passend wählen, SSD statt HDD, eine sichere Schritt-für-Schritt-Installation und Kompatibilität vor dem Kauf prüfen.
Die schnelle Antwort
A POS terminal that boots slowly and lags between screens usually isn’t worn out — it’s starved of fast storage and memory. Two inexpensive upgrades fix the large majority of “the till is slow” complaints, and the only thing that trips people up is buying the wrong part. Get these three facts right and the upgrade drops straight in:
| Upgrade | Biggest gain | Must match | |
|---|---|---|---|
| HDD → SSD | Boot, app launch, DB reads | Form factor (2.5" SATA / M.2 / mSATA) | — |
| More RAM | Multitasking, newer OS headroom | DDR generation + DIMM vs SO-DIMM | — |
| Both together | Years of extra useful life | Confirm against the board's limits | — |
Warum aufrüsten und was aufrüstbar ist
POS terminals live a long time, and the software they run keeps growing — newer Windows builds, heavier back-office apps, more background services. A terminal that was snappy on day one can crawl years later not because the hardware failed, but because the workload outgrew the original spec. Before replacing a whole unit, look at what’s actually upgradeable:
- Storage (HDD → SSD): the highest-impact upgrade on any terminal still running a mechanical hard drive. Boot time, app launch and database queries all jump.
- RAM: add headroom when the terminal swaps to disk under load. Helps most when you run several apps, a newer OS, or memory-hungry POS software.
- Not upgradeable (usually): the CPU is typically soldered or board-locked on POS hardware, so memory and storage are where the wins are.
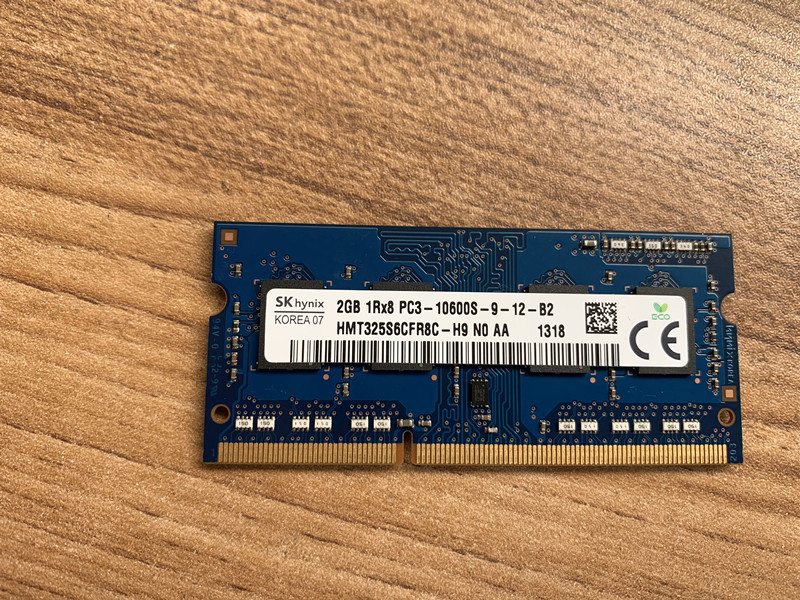
Den RAM treffen: Generation und Bauform
Memory has to match the motherboard on two axes: the DDR generation and the physical form factor. These are not interchangeable — the slot is keyed to reject the wrong one.
| What to match | Why it matters | |
|---|---|---|
| DDR generation (DDR3 / DDR4 / …) | Notch is in a different spot per gen — wrong gen won't seat | — |
| Form factor (DIMM vs SO-DIMM) | Desktop-style terminals use DIMM; compact all-in-ones use SO-DIMM | — |
| Speed (MHz) | Run at the board's supported speed; match within a kit | — |
| Capacity per slot + slot count | Stay within the board's max per slot and total | — |
| ECC vs non-ECC | Match what the board expects (most POS = non-ECC) | — |
HDD zu SSD: Typen und warum es mehr bringt
Replacing a mechanical hard drive with an SSD is the upgrade staff actually feel: no moving parts, far faster reads, and better resistance to the knocks and heat of a retail counter. The catch is the same as RAM — the form factor must physically fit.
| HDD (spinning) | SSD | |
|---|---|---|
| Boot / app launch | Slow | Fast |
| Moving parts | Yes (fails with shock/heat) | None |
| Reliability in retail | Lower | Higher |
| Noise / power | Higher | Lower |
| Best for | Legacy only | Every terminal upgrade |
| SSD form factor | Where it's used | Check | |
|---|---|---|---|
| 2.5" SATA | Drop-in for a 2.5" HDD bay | Bay/tray + SATA data+power | — |
| M.2 (SATA or NVMe) | Newer / compact terminals | M.2 key + length (2242/2280) + standoff | — |
| mSATA | Some older compact units | mSATA slot present | — |
Schritt für Schritt: sicher einbauen
The mechanics are quick once you have the right part. Work the sequence and don’t force anything — resistance almost always means a mismatch.
- 1
Back up and power down
Back up the terminal’s data and note any POS software licensing/activation. Shut down fully and unplug from mains.Caution: Don't skip the backup — a drive swap is the one upgrade where data is at stake. - 2
Go static-safe and open up
Discharge static (touch bare metal or wear an anti-static strap), then open the access panel. Handle modules and drives by the edges only. - 3
Fit the RAM
Align the module’s notch with the slot key and press firmly until both side clips click home. With multiple slots, follow the board’s population order. - 4
Fit the SSD (clone or fresh install)
For a 2.5" SSD, seat it in the bay and connect SATA data+power; for M.2, insert at an angle and secure the screw. Either clone the old drive to the SSD first, or do a clean OS install and restore your POS software. - 5
Reassemble and verify
Close up, power on, and confirm in BIOS/OS that the full RAM is detected and the SSD boots. Re-check your POS software launches and the database opens.
Kompatibilität vor dem Kauf bestätigen
Five quick confirmations before you order turn a guess into a guaranteed-fit upgrade:
| Confirm | How | |
|---|---|---|
| DDR generation + speed | Existing module label, or terminal manual | — |
| Form factor (DIMM/SO-DIMM) | Visual: full-size vs short module | — |
| Max RAM + free slots | Board spec; how many slots are already used | — |
| Drive interface + size | 2.5" SATA vs M.2 (key + length) vs mSATA | — |
| OS plan | Clone vs clean install; licensing on hand | — |
Browse compatible memory and drives in our storage & memory category, and boards in mainboards. To identify your exact terminal so we match the right module and drive, use the terminal & model identification guide. Send us a photo of the existing memory label and the terminal’s model plate and we’ll confirm the exact compatible parts before you order.
Häufig gestellte Fragen
Bringt mehr RAM oder eine SSD bei einem langsamen POS-Terminal mehr?
Woher weiß ich, welchen RAM mein POS-Terminal nimmt?
Kann ich DDR4 in einen DDR3-Slot setzen (oder mischen)?
Welche SSD-Bauform nutzt ein POS-Terminal?
Muss ich nach dem Laufwerkstausch das Betriebssystem neu installieren?
Vorsichtsmaßnahmen beim Einbau von RAM oder SSD?
Quellen & weiterführende Literatur
- POS Terminal Compatible Memory Upgrades — Mr Memory
- Hardware Upgrade Compatibility (RAM & storage) — Origin Storage
- How to Upgrade & Install RAM in Your PC — Corsair
- How to Install or Upgrade Memory in a Computer — Dell
- How to Upgrade RAM on Your Laptop or PC — NinjaOne
Verwandte Anleitungen
All-in-One vs modulare POS-Terminals: Was kaufen (und wie jedes Reparaturen beeinflusst)
All-in-One ist aufgeräumt und schnell einsatzbereit; modular ist flexibel und günstiger aufzurüsten und zu reparieren. Die richtige Antwort hängt von Größe, Wachstumsplänen — und wie Sie Ausfälle handhaben wollen.
Anleitung lesen →Barcode-Scanner-Kaufratgeber: 1D-Laser vs 2D-Imager, kabelgebunden vs kabellos, handgeführt vs freihändig
Zwei Fragen entscheiden das meiste: Müssen Sie Handy-Displays scannen (dann 2D), und ist Ihre Kasse voll genug für freihändig? So passen Scannertechnik, Bauform und Anschluss zur realen Nutzung.
Anleitung lesen →Beleg-Auto-Cutter: Guillotine vs Rotation, Teilschnitt vs Vollschnitt, und Klingen-Lebensdauer
Guillotine oder Rotation? Teil- oder Vollschnitt? Der Cutter ist das meistgenutzte bewegliche Teil im Belegdrucker — der richtige Typ und Schnittmodus hält die Kasse schnell und die Belege ordentlich.
Anleitung lesen →Verwandte Kategorien
Empfohlene Ersatzteile
%20Sparta%20Riser%20Card/120c399634d85265f7a7595a979407ee_c48b4b186f0a2eea2b86d0d5a86c219e_s-l1600.jpg)
Benötigen Sie die in dieser Anleitung erwähnten Teile?
Originale OEM- und werksgeprüfte Aftermarket-Teile für IBM, Toshiba, NCR, Diebold, Wincor und Hyosung Systeme — mit weltweitem Versand.