Guía de mejora de RAM y SSD para terminal POS: acertar la memoria, pasar a SSD, instalarlo bien
Una guía de compra para mejorar la RAM y el almacenamiento de un terminal POS — acertar la generación DDR y el formato, elegir un SSD en lugar de un disco duro, una instalación paso a paso segura, y confirmar la compatibilidad antes de pedir.
La respuesta rápida
A POS terminal that boots slowly and lags between screens usually isn’t worn out — it’s starved of fast storage and memory. Two inexpensive upgrades fix the large majority of “the till is slow” complaints, and the only thing that trips people up is buying the wrong part. Get these three facts right and the upgrade drops straight in:
| Upgrade | Biggest gain | Must match | |
|---|---|---|---|
| HDD → SSD | Boot, app launch, DB reads | Form factor (2.5" SATA / M.2 / mSATA) | — |
| More RAM | Multitasking, newer OS headroom | DDR generation + DIMM vs SO-DIMM | — |
| Both together | Years of extra useful life | Confirm against the board's limits | — |
Por qué mejorar, y qué se puede mejorar
POS terminals live a long time, and the software they run keeps growing — newer Windows builds, heavier back-office apps, more background services. A terminal that was snappy on day one can crawl years later not because the hardware failed, but because the workload outgrew the original spec. Before replacing a whole unit, look at what’s actually upgradeable:
- Storage (HDD → SSD): the highest-impact upgrade on any terminal still running a mechanical hard drive. Boot time, app launch and database queries all jump.
- RAM: add headroom when the terminal swaps to disk under load. Helps most when you run several apps, a newer OS, or memory-hungry POS software.
- Not upgradeable (usually): the CPU is typically soldered or board-locked on POS hardware, so memory and storage are where the wins are.
Acertar la RAM: generación y formato
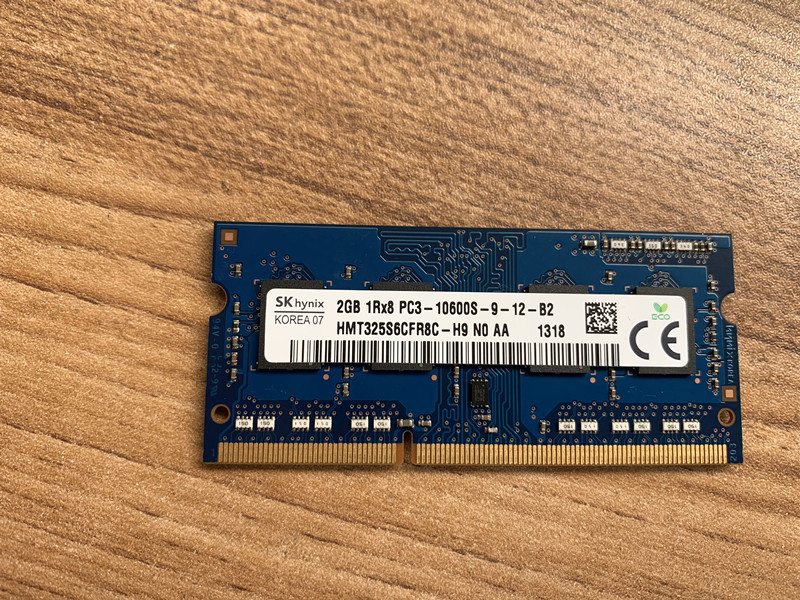
Memory has to match the motherboard on two axes: the DDR generation and the physical form factor. These are not interchangeable — the slot is keyed to reject the wrong one.
| What to match | Why it matters | |
|---|---|---|
| DDR generation (DDR3 / DDR4 / …) | Notch is in a different spot per gen — wrong gen won't seat | — |
| Form factor (DIMM vs SO-DIMM) | Desktop-style terminals use DIMM; compact all-in-ones use SO-DIMM | — |
| Speed (MHz) | Run at the board's supported speed; match within a kit | — |
| Capacity per slot + slot count | Stay within the board's max per slot and total | — |
| ECC vs non-ECC | Match what the board expects (most POS = non-ECC) | — |
De HDD a SSD: tipos y por qué es la mayor mejora
Replacing a mechanical hard drive with an SSD is the upgrade staff actually feel: no moving parts, far faster reads, and better resistance to the knocks and heat of a retail counter. The catch is the same as RAM — the form factor must physically fit.
| HDD (spinning) | SSD | |
|---|---|---|
| Boot / app launch | Slow | Fast |
| Moving parts | Yes (fails with shock/heat) | None |
| Reliability in retail | Lower | Higher |
| Noise / power | Higher | Lower |
| Best for | Legacy only | Every terminal upgrade |
| SSD form factor | Where it's used | Check | |
|---|---|---|---|
| 2.5" SATA | Drop-in for a 2.5" HDD bay | Bay/tray + SATA data+power | — |
| M.2 (SATA or NVMe) | Newer / compact terminals | M.2 key + length (2242/2280) + standoff | — |
| mSATA | Some older compact units | mSATA slot present | — |
Paso a paso: una instalación segura
The mechanics are quick once you have the right part. Work the sequence and don’t force anything — resistance almost always means a mismatch.
- 1
Back up and power down
Back up the terminal’s data and note any POS software licensing/activation. Shut down fully and unplug from mains.Caution: Don't skip the backup — a drive swap is the one upgrade where data is at stake. - 2
Go static-safe and open up
Discharge static (touch bare metal or wear an anti-static strap), then open the access panel. Handle modules and drives by the edges only. - 3
Fit the RAM
Align the module’s notch with the slot key and press firmly until both side clips click home. With multiple slots, follow the board’s population order. - 4
Fit the SSD (clone or fresh install)
For a 2.5" SSD, seat it in the bay and connect SATA data+power; for M.2, insert at an angle and secure the screw. Either clone the old drive to the SSD first, or do a clean OS install and restore your POS software. - 5
Reassemble and verify
Close up, power on, and confirm in BIOS/OS that the full RAM is detected and the SSD boots. Re-check your POS software launches and the database opens.
Confirmar compatibilidad antes de pedir
Five quick confirmations before you order turn a guess into a guaranteed-fit upgrade:
| Confirm | How | |
|---|---|---|
| DDR generation + speed | Existing module label, or terminal manual | — |
| Form factor (DIMM/SO-DIMM) | Visual: full-size vs short module | — |
| Max RAM + free slots | Board spec; how many slots are already used | — |
| Drive interface + size | 2.5" SATA vs M.2 (key + length) vs mSATA | — |
| OS plan | Clone vs clean install; licensing on hand | — |
Browse compatible memory and drives in our storage & memory category, and boards in mainboards. To identify your exact terminal so we match the right module and drive, use the terminal & model identification guide. Send us a photo of the existing memory label and the terminal’s model plate and we’ll confirm the exact compatible parts before you order.
Preguntas frecuentes
¿Más RAM o un SSD marcará más diferencia en un terminal POS lento?
¿Cómo sé qué RAM acepta mi terminal POS?
¿Puedo poner DDR4 en un slot DDR3 (o mezclarlas)?
¿Qué formato de SSD usa un terminal POS?
¿Debo reinstalar el sistema operativo tras cambiar el disco?
¿Alguna precaución al instalar RAM o un SSD?
Fuentes y lecturas complementarias
- POS Terminal Compatible Memory Upgrades — Mr Memory
- Hardware Upgrade Compatibility (RAM & storage) — Origin Storage
- How to Upgrade & Install RAM in Your PC — Corsair
- How to Install or Upgrade Memory in a Computer — Dell
- How to Upgrade RAM on Your Laptop or PC — NinjaOne
Guías relacionadas
Terminales POS todo-en-uno vs modulares: cuál comprar (y cómo afecta cada uno las reparaciones)
El todo-en-uno es ordenado y rápido de desplegar; el modular es flexible y más barato de actualizar y reparar. La respuesta correcta depende de tu tamaño, planes de crecimiento — y cómo quieres manejar los fallos.
Leer guía →Guía de compra de lectores de código de barras: láser 1D vs imager 2D, con cable vs inalámbrico, de mano vs manos libres
Dos preguntas deciden la mayor parte: ¿necesitas escanear pantallas de móvil (entonces 2D), y tu mostrador está lo bastante ocupado para querer manos libres? Aquí está cómo tecnología, formato y conexión se ajustan al uso real.
Leer guía →Cortadores automáticos de impresora de recibos: guillotina vs rotativo, corte parcial vs total, y vida de la cuchilla
¿Guillotina o rotativo? ¿Corte parcial o total? El cortador es la pieza móvil más usada de una impresora de recibos — el tipo y modo correctos mantienen la caja rápida y los recibos ordenados.
Leer guía →Categorías relacionadas
Repuestos destacados
%20Sparta%20Riser%20Card/120c399634d85265f7a7595a979407ee_c48b4b186f0a2eea2b86d0d5a86c219e_s-l1600.jpg)
¿Necesita las piezas mencionadas en esta guía?
Piezas OEM originales y alternativas probadas en fábrica para sistemas IBM, Toshiba, NCR, Diebold, Wincor y Hyosung — con envío mundial.