Апгрейд ОЗУ и SSD POS-терминала: подобрать память, перейти на SSD, правильно установить
Руководство по апгрейду ОЗУ и накопителя POS-терминала — подбор поколения DDR и форм-фактора, выбор SSD вместо HDD, безопасная пошаговая установка и проверка совместимости перед заказом.
Быстрый ответ
A POS terminal that boots slowly and lags between screens usually isn’t worn out — it’s starved of fast storage and memory. Two inexpensive upgrades fix the large majority of “the till is slow” complaints, and the only thing that trips people up is buying the wrong part. Get these three facts right and the upgrade drops straight in:
| Upgrade | Biggest gain | Must match | |
|---|---|---|---|
| HDD → SSD | Boot, app launch, DB reads | Form factor (2.5" SATA / M.2 / mSATA) | — |
| More RAM | Multitasking, newer OS headroom | DDR generation + DIMM vs SO-DIMM | — |
| Both together | Years of extra useful life | Confirm against the board's limits | — |
Зачем апгрейд и что апгрейдится
POS terminals live a long time, and the software they run keeps growing — newer Windows builds, heavier back-office apps, more background services. A terminal that was snappy on day one can crawl years later not because the hardware failed, but because the workload outgrew the original spec. Before replacing a whole unit, look at what’s actually upgradeable:
- Storage (HDD → SSD): the highest-impact upgrade on any terminal still running a mechanical hard drive. Boot time, app launch and database queries all jump.
- RAM: add headroom when the terminal swaps to disk under load. Helps most when you run several apps, a newer OS, or memory-hungry POS software.
- Not upgradeable (usually): the CPU is typically soldered or board-locked on POS hardware, so memory and storage are where the wins are.
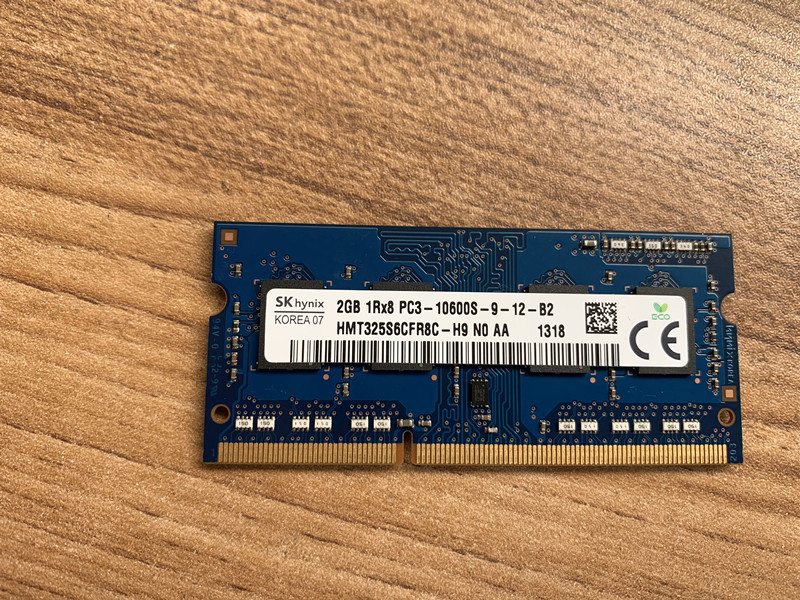
Подбор ОЗУ: поколение и форм-фактор
Memory has to match the motherboard on two axes: the DDR generation and the physical form factor. These are not interchangeable — the slot is keyed to reject the wrong one.
| What to match | Why it matters | |
|---|---|---|
| DDR generation (DDR3 / DDR4 / …) | Notch is in a different spot per gen — wrong gen won't seat | — |
| Form factor (DIMM vs SO-DIMM) | Desktop-style terminals use DIMM; compact all-in-ones use SO-DIMM | — |
| Speed (MHz) | Run at the board's supported speed; match within a kit | — |
| Capacity per slot + slot count | Stay within the board's max per slot and total | — |
| ECC vs non-ECC | Match what the board expects (most POS = non-ECC) | — |
С HDD на SSD: типы и почему это больший выигрыш
Replacing a mechanical hard drive with an SSD is the upgrade staff actually feel: no moving parts, far faster reads, and better resistance to the knocks and heat of a retail counter. The catch is the same as RAM — the form factor must physically fit.
| HDD (spinning) | SSD | |
|---|---|---|
| Boot / app launch | Slow | Fast |
| Moving parts | Yes (fails with shock/heat) | None |
| Reliability in retail | Lower | Higher |
| Noise / power | Higher | Lower |
| Best for | Legacy only | Every terminal upgrade |
| SSD form factor | Where it's used | Check | |
|---|---|---|---|
| 2.5" SATA | Drop-in for a 2.5" HDD bay | Bay/tray + SATA data+power | — |
| M.2 (SATA or NVMe) | Newer / compact terminals | M.2 key + length (2242/2280) + standoff | — |
| mSATA | Some older compact units | mSATA slot present | — |
Пошагово: безопасная установка
The mechanics are quick once you have the right part. Work the sequence and don’t force anything — resistance almost always means a mismatch.
- 1
Back up and power down
Back up the terminal’s data and note any POS software licensing/activation. Shut down fully and unplug from mains.Caution: Don't skip the backup — a drive swap is the one upgrade where data is at stake. - 2
Go static-safe and open up
Discharge static (touch bare metal or wear an anti-static strap), then open the access panel. Handle modules and drives by the edges only. - 3
Fit the RAM
Align the module’s notch with the slot key and press firmly until both side clips click home. With multiple slots, follow the board’s population order. - 4
Fit the SSD (clone or fresh install)
For a 2.5" SSD, seat it in the bay and connect SATA data+power; for M.2, insert at an angle and secure the screw. Either clone the old drive to the SSD first, or do a clean OS install and restore your POS software. - 5
Reassemble and verify
Close up, power on, and confirm in BIOS/OS that the full RAM is detected and the SSD boots. Re-check your POS software launches and the database opens.
Подтвердите совместимость перед заказом
Five quick confirmations before you order turn a guess into a guaranteed-fit upgrade:
| Confirm | How | |
|---|---|---|
| DDR generation + speed | Existing module label, or terminal manual | — |
| Form factor (DIMM/SO-DIMM) | Visual: full-size vs short module | — |
| Max RAM + free slots | Board spec; how many slots are already used | — |
| Drive interface + size | 2.5" SATA vs M.2 (key + length) vs mSATA | — |
| OS plan | Clone vs clean install; licensing on hand | — |
Browse compatible memory and drives in our storage & memory category, and boards in mainboards. To identify your exact terminal so we match the right module and drive, use the terminal & model identification guide. Send us a photo of the existing memory label and the terminal’s model plate and we’ll confirm the exact compatible parts before you order.
Часто задаваемые вопросы
Что больше поможет медленному POS-терминалу — больше ОЗУ или SSD?
Как узнать, какое ОЗУ подходит моему POS-терминалу?
Можно ли поставить DDR4 в слот DDR3 (или смешать)?
Какой форм-фактор SSD у POS-терминала?
Нужно ли переустанавливать ОС после замены накопителя?
Меры предосторожности при установке ОЗУ или SSD?
Источники и дополнительные материалы
- POS Terminal Compatible Memory Upgrades — Mr Memory
- Hardware Upgrade Compatibility (RAM & storage) — Origin Storage
- How to Upgrade & Install RAM in Your PC — Corsair
- How to Install or Upgrade Memory in a Computer — Dell
- How to Upgrade RAM on Your Laptop or PC — NinjaOne
Связанные руководства
Моноблочные против модульных POS-терминалов: что покупать (и как каждый влияет на ремонт)
Моноблок аккуратен и быстр в развёртывании; модульный гибок и дешевле в апгрейде и ремонте. Верный ответ зависит от размера, планов роста — и как вы хотите обрабатывать отказы.
Читать →Руководство по выбору сканера штрихкодов: 1D-лазер против 2D-имиджера, проводной против беспроводного, ручной против бесконтактного
Большинство решают два вопроса: нужно ли сканировать экраны телефонов (тогда 2D) и достаточно ли загружена касса, чтобы хотеть бесконтактный режим? Вот как технология, форм-фактор и подключение ложатся на реальную работу.
Читать →Автоотрезчики чековых принтеров: гильотинный против ротационного, частичный против полного реза, и ресурс лезвия
Гильотинный или ротационный? Частичный или полный рез? Отрезчик — самая нагруженная движущаяся часть чекового принтера: правильный тип и режим держат кассу быстрой, а чеки опрятными.
Читать →Связанные категории
Рекомендуемые запчасти
%20Sparta%20Riser%20Card/120c399634d85265f7a7595a979407ee_c48b4b186f0a2eea2b86d0d5a86c219e_s-l1600.jpg)
Нужны детали, упомянутые в этом руководстве?
Оригинальные OEM-детали и заводские аналоги для систем IBM, Toshiba, NCR, Diebold, Wincor и Hyosung — с доставкой по всему миру.