Fallo de la fuente de alimentación POS y cajero: diagnóstico, prueba con multímetro y reemplazo según especificación
Una guía práctica para diagnosticar una fuente POS/ATM muerta o inestable — leer los síntomas, medir el voltaje de salida y el rizado con multímetro, detectar condensadores defectuosos, y elegir un reemplazo seguro por voltaje, amperaje, polaridad y conector.
El triaje rápido
When a POS terminal or ATM goes dark, the power supply is the first suspect — not the motherboard. Power supplies are wear parts that run hot for years; boards rarely fail outright. Before you condemn anything expensive, run this fast triage:
| Step | What it rules out | |
|---|---|---|
| 1. Test the outlet | A dead socket or tripped breaker mimics a dead supply | — |
| 2. Inspect the brick & cable | Status LED off, frayed cable or bent connector pins | — |
| 3. Measure the output voltage | Confirms the supply delivers within ±5% of its rating | — |
| 4. Substitute a known-good supply | If the terminal boots, the supply was the fault — done | — |
| 5. Only then suspect the board | Proven-good power is the prerequisite for board diagnosis | — |
Leer los síntomas
The failure pattern tells you a lot before you pick up a meter. A supply rarely dies cleanly — it usually degrades, and the symptom points to the cause:
| Symptom | Most likely cause | |
|---|---|---|
| Completely dead, no lights | Failed supply, blown fuse, or dead outlet/cable | — |
| Random reboots under load | Aging filter capacitors sagging when current spikes | — |
| Powers on, then shuts off | Over-current/over-temp protection tripping | — |
| Fan spins but no boot | One output rail down, or board not getting standby power | — |
| Burning smell / buzzing | Failing transformer or capacitor — power off immediately | — |
| Swollen / leaking capacitor | Definitive supply (or board power-section) failure | — |
Confirmarlo con un multímetro
A multimeter turns guesswork into a yes/no answer in under five minutes. Work through these steps; the goal is to prove the supply good or bad before touching the board.
- 1
Verify input power
Confirm the wall outlet works with another device and the cable is fully seated. Check for an inline fuse or a reset switch on the supply. Rule out the obvious before you measure. - 2
Inspect for physical failure
Look (and smell) for bulging or leaking capacitors, scorch marks, a melted connector or a burning odour. Any of these is a confirmed fault — stop and replace.Caution: Never open a sealed external adapter that's still plugged in. Unplug and let it sit before any internal inspection. - 3
Measure DC output voltage
Set the meter to DC volts and probe the output (centre pin to barrel, or the labelled + / − pins). It should read within ~±5% of the rating — a 12V supply should show roughly 11.4–12.6V. Far off, drifting or zero = failed. - 4
Check ripple on AC volts
For terminals that reboot or glitch, switch the meter to AC volts on the same DC output. More than about 100mV of AC ripple indicates failing filter capacitors even when the DC reading looks healthy. - 5
Substitute a known-good supply
The decisive test: connect a spare supply of identical voltage, polarity and connector. If the terminal boots and runs stably, the original supply was the fault. If it still won’t boot, now suspect the board.
Dentro de una fuente conmutada: por qué fallan los condensadores
Most modern POS and ATM supplies are switching supplies: they rectify mains AC to high-voltage DC, chop it at high frequency through a transformer, then rectify and smooth it back to clean low-voltage DC. The components that smooth that output — the electrolytic filter capacitors — are the most common point of failure.
Capacitors are rated for a finite number of hours at temperature. In a POS terminal running 12–16 hours a day for years — often in a warm, dusty under-counter space — they dry out, lose capacitance and stop smoothing the output. That’s why a supply can pass a quick voltage check yet still cause reboots: the DC average is fine, but the ripple riding on it has grown beyond what the board tolerates.
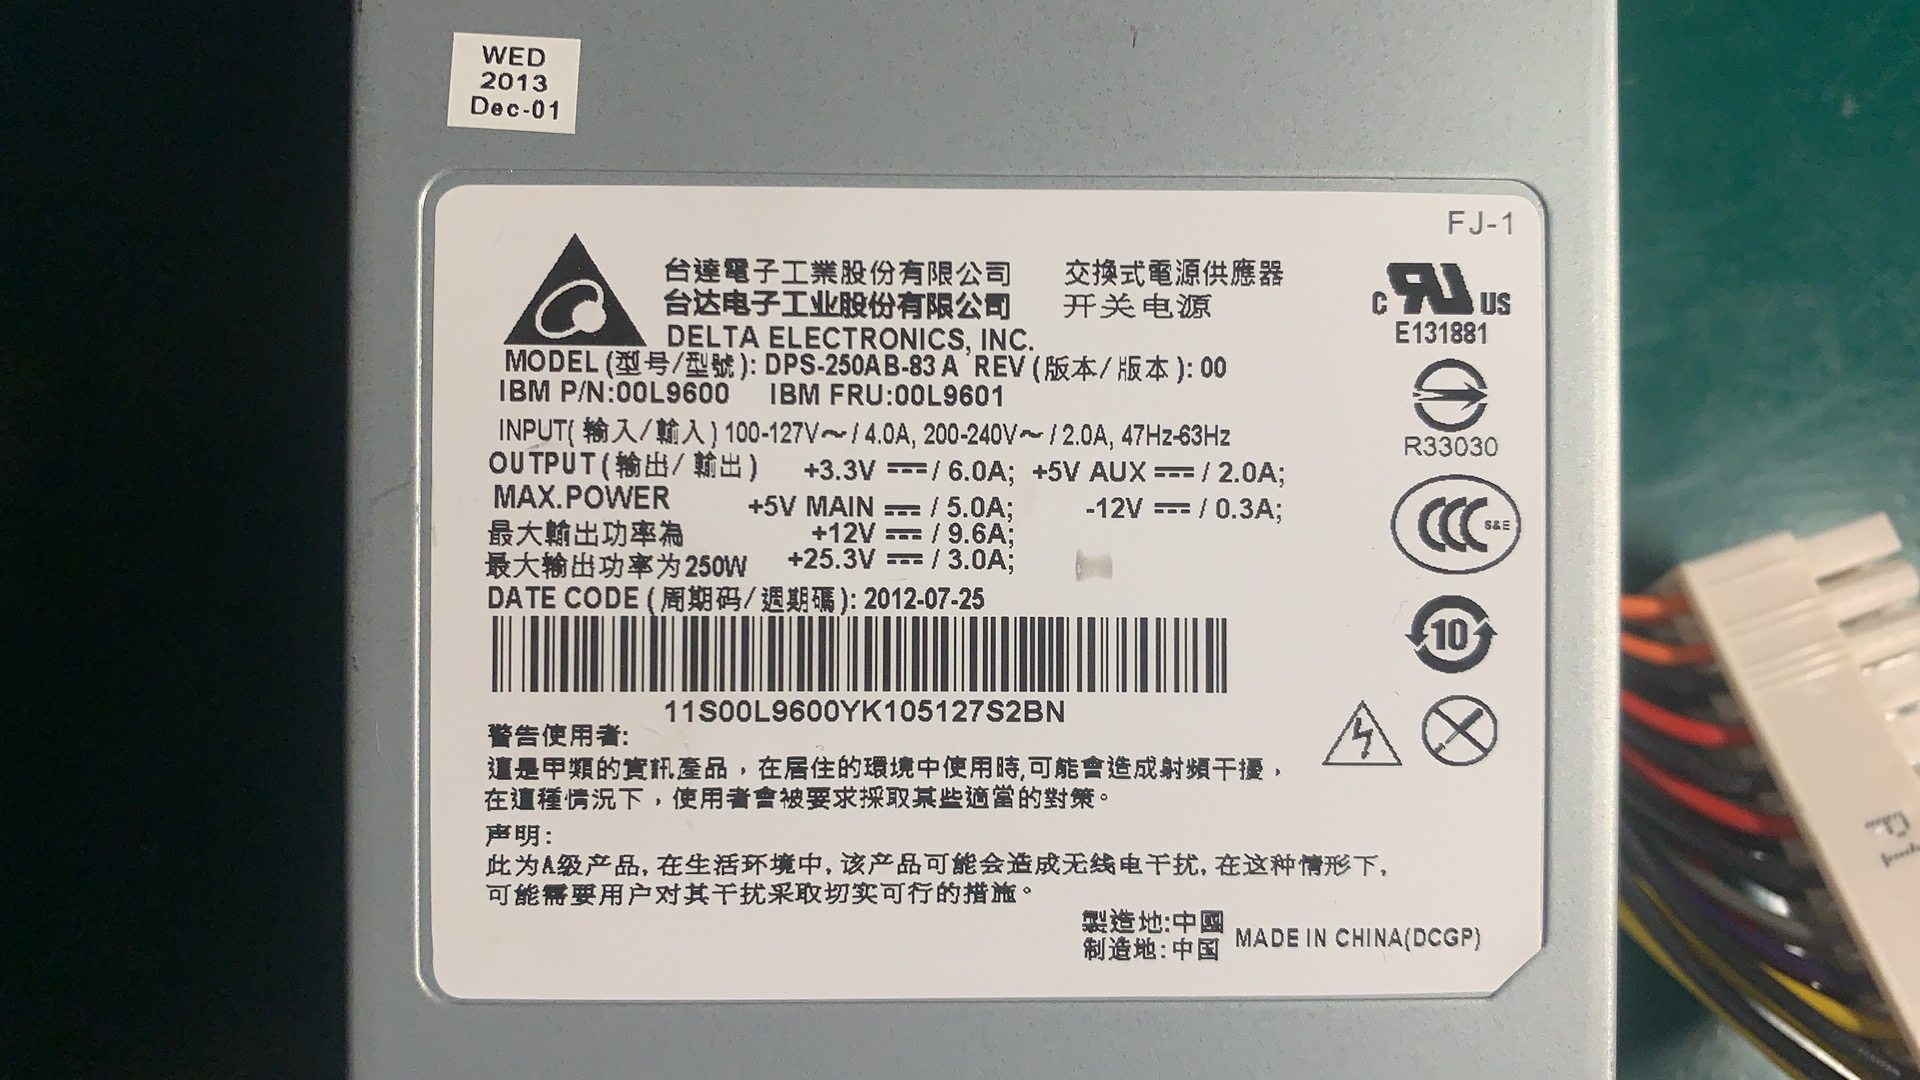
Elegir un reemplazo seguro
Choosing a replacement is where terminals get accidentally destroyed. Four specs must line up. Three are non-negotiable; only amperage has any headroom:
| Spec | Rule | |
|---|---|---|
| Voltage | Must match exactly (12V stays 12V). Wrong voltage damages the device. | — |
| Polarity | Centre-positive vs centre-negative must match. Reversed polarity is instant damage. | — |
| Connector / barrel | Same plug type and barrel size, or it won't fit (or fits loosely and arcs). | — |
| Amperage (current) | Equal or HIGHER is safe. The device draws only what it needs. | — |
| Regulation | Match regulated with regulated; an unregulated swap can over-volt at low load. | — |
Conseguir la fuente correcta
POS and ATM hardware uses a wide range of supplies — external bricks for terminals and peripherals, internal switching units for all-in-one terminals, and high-current supplies for ATMs. Match yours to the original by reading the label, or send us the model and we’ll cross-reference it:
| Supply type | Typical use | |
|---|---|---|
| External adapter (brick) | Terminals, displays, card readers, peripherals | — |
| Internal switching PSU | All-in-one POS terminals, larger receipt printers | — |
| Printer power supply | Thermal/impact receipt printers (often 24V) | — |
| ATM power supply | Cash dispensers, deposit modules — high current | — |
| DC-DC converter | On-board rail conversion inside terminals | — |
Browse spec-matched units in our power supplies category, or related boards and modules in POS terminal repair parts. If a proven-good supply still won’t boot the terminal, the fault is upstream on the board — our terminal & model identification guide helps you find the exact machine type so we can match the right mainboard or FRU. Send us the label photo and we’ll confirm the correct power supply before you order.
Preguntas frecuentes
Mi terminal POS está completamente muerto — ¿es la fuente o la placa base?
¿Cómo pruebo una fuente con un multímetro?
¿Puedo usar un adaptador de mayor amperaje como reemplazo?
¿Qué significa un condensador hinchado o con fugas?
¿Por qué mi terminal se reinicia o apaga aleatoriamente bajo carga?
¿Vale la pena reparar una fuente o reemplazarla?
Fuentes y lecturas complementarias
- POS Terminal Turn-On Troubleshooting — Volcora Help Center
- Switching Power Supply Troubleshooting & Repair Guide — ATO
- Power Supply Troubleshooting and Testing — Control.com
- Basics of Troubleshooting Power Supplies — Test & Measurement Tips
- Troubleshooting Point-of-Sale PCB Failures — ALLPCB
Guías relacionadas
Cableado y conexión del cajón de dinero: drawer-kick RJ11/RJ12, accionado por impresora vs USB, y el pulso de 12–24V
Un cajón de dinero POS no se enchufa a la caja — lo abre un pulso de 12–24V de la impresora de recibos por un cable RJ11/RJ12. Interfaz, pines y voltaje correctos, y funciona.
Leer guía →¿Ventilador POS ruidoso o fallando? Diagnostica el rodamiento, límpialo y elige un reemplazo
Un ventilador POS que rechina o silba suele ser polvo o un rodamiento gastado — ignorado, lleva a sobrecalentamiento y apagones. Aquí está cómo hallar el ventilador ruidoso, decidir limpiar-o-reemplazar, y elegir el correcto.
Leer guía →¿El recibo imprime tenue, oscuro, parcial o con rayas? Solución de calidad de impresión térmica (empieza por el autotest)
Recibos tenues, con rayas o de un lado casi siempre se deben a un cabezal sucio, al papel equivocado o a un ajuste de densidad — no a una impresora muerta. Un autotest dice si la solución es software o hardware.
Leer guía →Categorías relacionadas
Repuestos destacados

%20Sparta%20Riser%20Card/120c399634d85265f7a7595a979407ee_c48b4b186f0a2eea2b86d0d5a86c219e_s-l1600.jpg)
¿Necesita las piezas mencionadas en esta guía?
Piezas OEM originales y alternativas probadas en fábrica para sistemas IBM, Toshiba, NCR, Diebold, Wincor y Hyosung — con envío mundial.